MGSLG ICTCFT. (2017). Introduction of cells, sheets, labels and values (CC BY-SA)
معاينة
Should you find it easier to follow the necessary steps by reading the video transcript, please follow the instructions below:
- Once the Windows desktop is in full view select the ‘Start’ Button in the bottom left corner, Scroll down the list of programs until you can see select the Microsoft Office folder and click on ‘Microsoft Excel’.
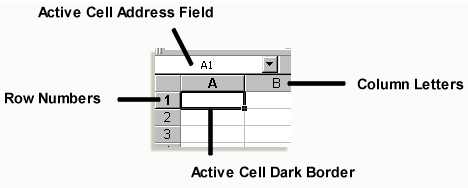
- The grid that now appears on the screen is known as a workbook. The grid is divided into cells. Each cell has an address or co-ordinates. The first cell for example is A1. This means that the cell is in the first column called A (columns run vertically) and is in row 1 (rows run horizontally). Every cell has an address. There are two ways to find out which cell you are in: the first way is to keep an eye on the 'Active Cell' field. In this window the address of the active cell is written. The second is to look for the cell that has a dark border around it.
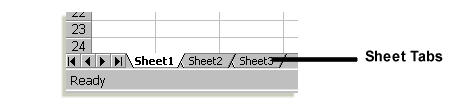
- It is important to also realize you are on page 1 of the workbook. To switch to a fresh sheet select the ‘sheet2’ tab that appears in the bottom left hand corner. Should you ever need a fresh page, for example another class’s marks, then you can navigate between the various pages by selecting the correct sheet.
- All labels, usually letters, are by default aligned to the left when entered into any cell. When doing calculations, the program excludes all labels. If you want to insert numbers as labels (e.g. grade ‘9 or the year ‘2017) then you insert an apostrophe before typing in the numbers.
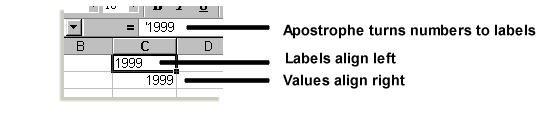
- All values (numbers) are by default aligned to the right of a cell.
آخر تعديل: Wednesday، 28 September 2022، 10:19 AM